
Mini Lemon Meringue Pies (Gluten free and dairy free)
Author & Photographer: Malka Schreier
I developed this recipe over the summer based on a few recipes I found on the internet. During quarantine, I have been baking a lot. Since I do not see anyone except for my immediate family, I thought miniature versions of desserts would be a good way to make them more reasonable serving sizes and also easier to carry. I was able to share this dessert, socially distanced, with my grandparents on several occasions. I made it dairy and gluten free to accommodate my mother, but the first time my grandparents tried it, they didn’t notice any difference–so hopefully it won’t make much of a difference for you either!
I’ve tested a few different versions of this recipe, and while it won’t be ruined if not everything is totally precise, there are a few things that make a big difference. Making sure the pastry sticks together on its own before putting it in the fridge is big (add more flour if it is sticking to the sides of the bowl). I would also recommend you use very sour lemons (not Meyer lemons). When I tried with Meyer lemons, the curd was very sweet, and it was too overpowering when combined with the sweetness of the meringue it was too much. On that note, don’t hesitate to par down the sugar on the lemon curd (I’ve already reduced it several times from the original recipe), and add more zest or lemon juice. For the meringue, the piping is not absolutely necessary. I think it looks prettier, but I have also just spooned it on in the past .
Enjoy!
Mini Lemon Meringue Pies Recipe
Pie Crust adapted from Mama Knows Gluten Free
Recipe adapted from Savormania
Servings: 8
Preparation time: 30 minutes
Rest time: 2 hours
Cook time: 25 minutes
Ingredients
For the pastry:
1 ½ cup AP gluten-free flour
2 tbsp sugar
¼ tsp salt
½ cup dairy-free butter substitute
1 egg
¼ tsp apple cider vinegar
3 tbsp water
For the lemon curd:
1 cup granulated sugar
¾ cups cornstarch
2 cups water
5 tbsp dairy-free butter substitute
4 egg yolks
Zest from 2 lemons
1 cup lemon juice
For the meringue:
4 egg whites
¼ tsp cream of tartar
½ cup granulated sugar
¾ tsp vanilla extract
Instructions
For the pie crust:

Preheat the oven to 350 degrees F.
Put the butter and water into the freezer for at least 5 minutes (they should be very cold).
Meanwhile, combine the flour, sugar, salt, egg, and apple cider vinegar in a stand-up mixer.
Add the butter and water into the mixer and mix until combined. It should all stick together and not to the sides of the bowl-–if it sticks to the sides of the bowl, add more flour a little at a time until it doesn’t.
Form the dough into a ball, wrap it in plastic wrap, and refrigerate for at least 2 hours, preferably overnight.
Take it out of the fridge and leave it out for 10 minutes.
Use a rolling pin to roll out the dough very thin, to about ¼ of an inch.
Grease mini pie pans with dairy-free butter.
Use the mini pie pans to outline the size/shape of the dough, then cut out the shape and place the dough circle into the mini pie pan.
Use a fork to poke holes in the crust (as shown in the picture).
Bake for 12 minutes.
For the lemon curd:

Combine the sugar, water and cornstarch in a pot, and heat it while stirring constantly until the mixture is thick and smooth. Lower the heat and add melted butter.
Combine the egg yolks and lemon zest in a separate bowl, and then add to the pot and stir until combined.
Add the lemon juice gradually, stirring until completely combined.
For the meringue:
Preheat the oven to 350 degrees F.
Beat the egg whites and cream of tartar until fluffy, and then gradually add sugar until stiff peaks form. Add vanilla extract and beat until combined.
Spread a layer of the lemon curd onto the pre-baked pie crusts. It should fill the mini pies completely.
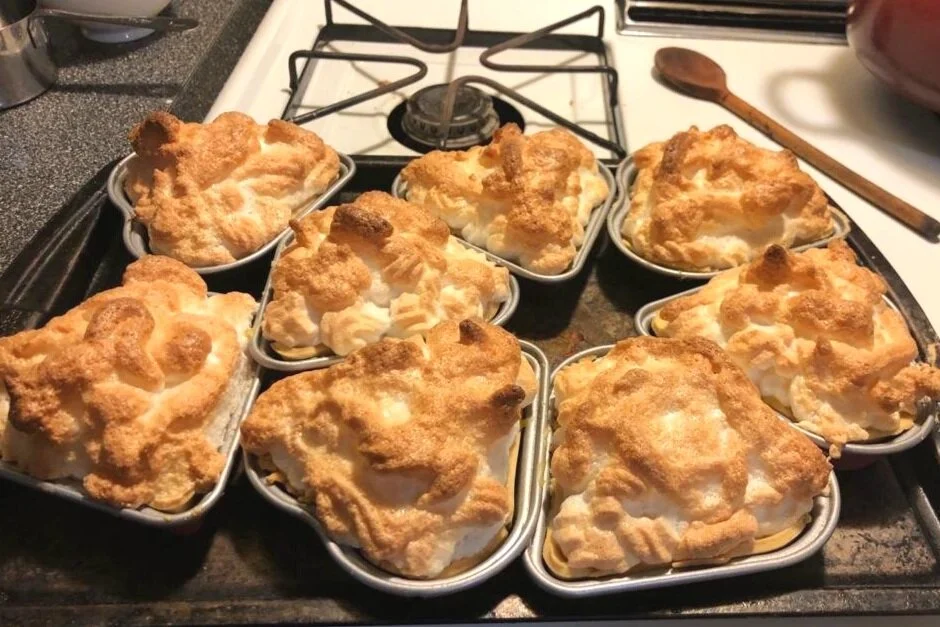
Put the meringue into a piping bag and pipe a generous layer of meringue with more in the middle to form a curved top.
Bake for another 12 minutes, or until the meringue becomes golden brown at the top (remember that every element has already been cooked except for the meringue).
Let cool and enjoy.